
Network Circuits
The world has gone online and all enterprises need to have some sort of WAN connectivity - at the very least connectivity to the global Internet. This network connectivity is called a circuit in industry parlance. Enterprises with multiple locations across a country or internationally also need to have inter-office connectivity which is usually provided with private MPLS or SDWAN circuits. With the popularity of SAAS and applications hosted in the data center, dedicated network circuits towards the datacenter are also not uncommon.
How to run a bandwidth speed test
Irrespective of the type and technology used, when a new inter-branch network circuit is provisioned - whether a private MPLS circuit or an SDWAN/Internet circuit - we need to test the bandwidth speed to ensure it meets the rate that the provider is promising and what we are paying for.
You can use Ostinato to run bandwidth tests at various packet sizes (or IMIX) to monitor the performance. Before we get to the test itself, let’s talk about the test topology.
Test Topology
Since we are testing geographically separated locations (say Site-A and Site-B), our test topology would look something like this -
DroneA@SiteA ==== (circuit under test) ==== DroneB@SiteB
     \                                          /
      \                                        /
    Mgmt N/W                               Mgmt N/W
        \                                    /
         +---------- Ostinato GUI ----------+
                      Controller
To recall, Drone is the Ostinato agent that does the actual traffic generation while the Ostinato GUI plays the role of the controller for the various Drone agents. For more details, read about the Ostinato agent-controller architecture.
The Ostinato GUI can run be run on either of the sites (A or B) or even a third site - as long as it has connectivity to both the Drones.
Ideally, Ostinato GUI should connect to the Drones out-of-band i.e. not via the circuit being tested e.g. via a management network or the public internet. This is to avoid the Ostinato controller-drone management traffic utilizing the bandwidth of the circuit under test.
If an out of band network is not available, you can configure the Ostinato-Drone connectivity via the circuit-under-test. Typically, this Ostinato management/control traffic will utilize very less bandwidth so would not affect the results very much. But the risk is that when the circuit is saturated, Ostinato may not be able to reach the Drones due to congestion.
Ostinato Configuration
Open the Ostinato GUI at whichever site you choose to as explained above.
In the Ostinato GUI use File | New PorGroup to add each of the two Drones, one by one.
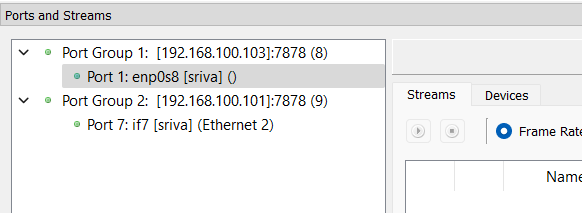
If you have multiple ports on each Drone, you can reserve the two ports at the circuit end points and then use View | Show reserved ports only to reduce the visual clutter.
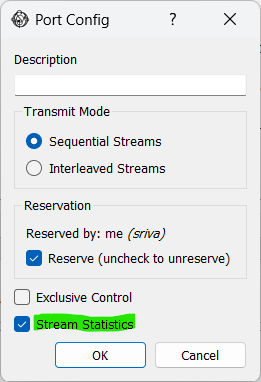
Port configuration
If aggregate TX and RX port rates are good enough for you, you can skip this step.
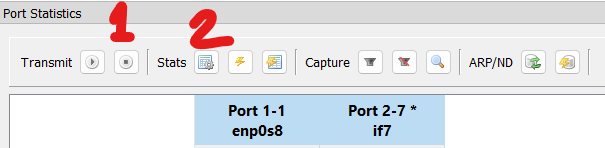
However, if you want detailed statistics including packet loss (however small), enable Stream Statistics on both the ports.
Endpoint IP configuration
If the two test ports on Ostinato are already configured with IP addresses (static or via DHCP assigned by the service provider), you can skip this step.
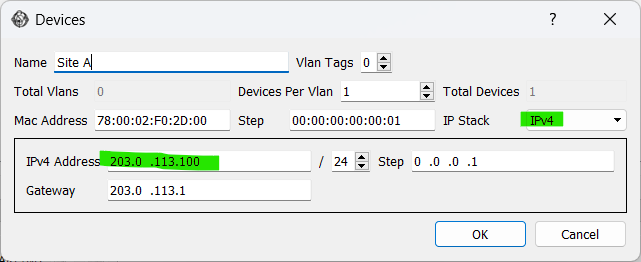
If the test ports have no IP configuration, you can use Ostinato device emulation to create an emulated device on each test port and set the IP stack to IPv4 or IPv6 as required.
Traffic stream
Next, select one of the circuit end point test ports and create a new traffic stream with the following characteristics -
- Protocols:
Mac | Ethernet | IPv4 (or IPv6) | UDP | Pattern Payload - Frame Length: 1000
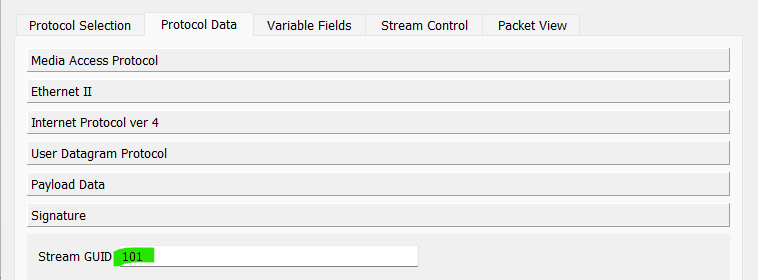
If using stream statistics, also add the Signature protocol to the stream.
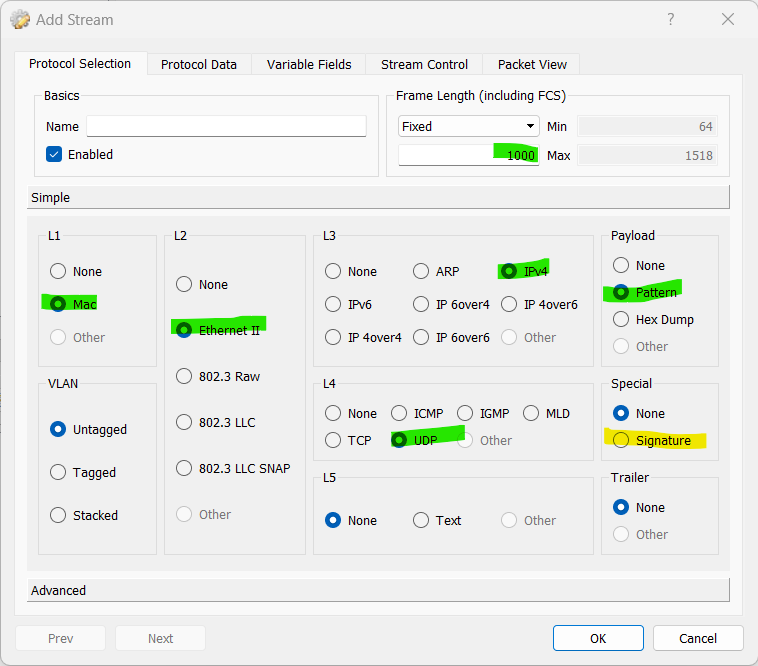
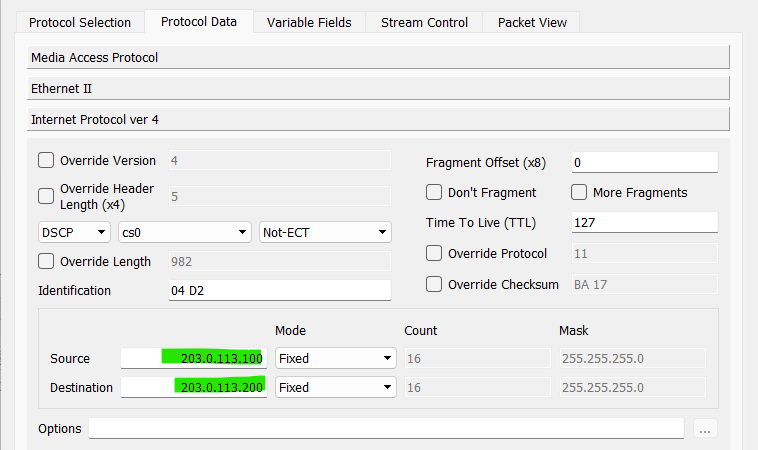
- Protocol Data (IP): Source IP - own IP, Destination IP - remote test port’s IP
- Signature GUID: Any unique value (only if stream statistics is enabled)
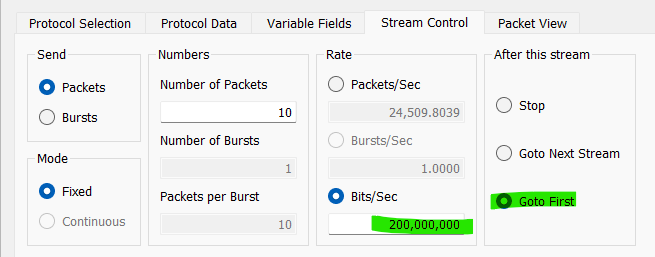
- Stream Control: Desired Rate and Goto First
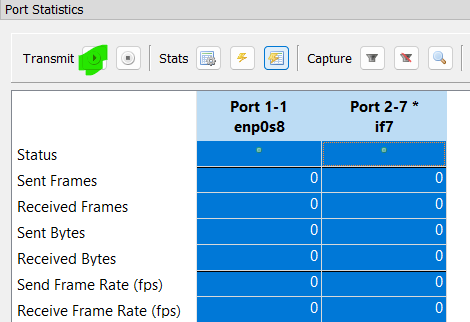
Click Apply and Start Transmit on the port to send unidirectional traffic on the circuit and monitor the port statistics.
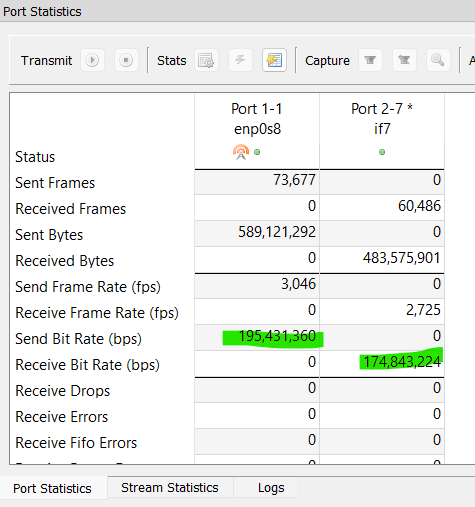
If no traffic is being received at the RX port, verify your IP and stream configuration and fix any mistakes.
Once the RX port starts receiving all (or most) of the traffic, you can use Fetch Stream Statistics to check packet loss - if any. You must stop transmit before you fetch stream statistics.

Note that the Stream statistics will not show any values for latency and jitter. This is because Ostinato (as of v1.3.0) supports these metrics only when both the Tx and Rx ports are on the same Drone.
Once we have verified unidirectional traffic, you can use Copy & Paste to configure the traffic stream on the other port and swap the IP addresses and run a unidirectional test from the reverse direction.
Once you have validated unidirectional traffic from each side, you can try bidirectional traffic by selecting both ports and clicking Start Transmit.
Bandwidth speed tests
You may already have a list of specific tests you want to run, but here are a few suggestions -
- Try traffic at various packet sizes - 64, 128, 256, 512, 1024, 1518
The reason we try multiple packet sizes (especially smaller packet size like 64 byte packets) is because most networking equipment performs well at larger packet sizes but struggles at smaller packet sizes. See how packet size affects throughput for the details.
- If the circuit supports jumbo packets, try additional packet sizes - 2048, 4096, 9000
Most networks today support higher MTUs and so the jumbo packet size test is important to ensure that jumbo packets are not being dropped contrary to what the provider has promised.
- If using IPv4, you may want to set the Don’t Fragment (DF) bit in the IP header to check if any fragmentation-reassembly is happening within the circuit
With the DF bit set, if the MTU anywhere within the circuit is smaller than the packet size, the packets will be dropped and not reach the Rx port.
- Try IMIX traffic
IMIX is a typical mix of packet sizes (supposedly) representing the mix of packet sizes on the Internet. See our IMIX testing guide for for more details.
- Monitor packet loss at each packet size
If the circuit struggles with smaller packet sizes, the likelihood of packet loss at those sizes is higher relative to larger packet sizes.
- Try unidirectional and bidirectional traffic
This test may expose any speed or half-duplex issues within the circuit
- Verify QOS with multiple traffic streams across the circuit
This will reveal circuit behaviour under saturation or congestion
If you perform these tests often, check out Ostinato PerfBench - automated standardized testing and reporting.
Caveats
We use UDP for our bandwidth test because we are testing raw circuit bandwidth. If you want to perform a TCP bandwidth test you will need to use some other test tool like iperf, TRex or WARP17 as Ostinato does not support stateful TCP traffic streams.
For the Drones at the two site endpoints, use Linux (or MacOS) as the OS to run the Drone because Drone for Windows is not recommended for performance tests. You can use the Ostinato GUI on Windows or any other OS.