
Importance of QOS in networks today
In the last few decades bandwidth has jumped many-folds - from a 56Kbps modem to 1Gbps broadband bandwidth entering our homes; internal networks at enterprises have gone from 10/100Mbps to Gigabit speeds. The bandwidths available at service provider and backbone networks are truly mind-boggling.
If we had enough bandwidth for all traffic end-to-end, we won’t need any quality of service in networking. But despite this massive increase in bandwidth capacity, that’s rarely the case. Hence network QOS or Quality of service is very important in this digital age.
At its core, QOS works by classifying traffic (typically based on the application) into multiple priorities as early as possible, preferably at or before the edge and marking it accordingly., All subsequent network devices in the path, which forward the traffic on a packet-by-packet basis, look at the priority marking inside the packet and depending on bandwidth availability, network congestion, network state and other factors, forward or drop the packet accordingly. If the decision is to forward the packet, the packet is enqueued into a set of queues on the egress port which is serviced by a QOS scheduler and/or traffic shaper.
Of course, that’s an over-simplistic explanation, but the focus of this post is not about QOS mechanisms itself, but to talk more about the types of priority markings and how you can use Ostinato to verify the network QOS with different priority markings.
To test network QOS or even an individual network device’s class of service (COS) configuration, you need to generate test traffic with the appropriate QOS markings.
Ostinato can help you do that easily. When testing QOS across a WAN circuit (e.g. MPLS or SD-WAN), see bandwidth testing with Ostinato for topology and circuit test setup; you can then add multiple streams with different QOS markings as described here.
Test Topology
First things first, let’s talk about the test topology.
A typical QOS test topology with Ostinato would like this -
    +----------------------+
    |                      |
Ostinato       Network (Device) Under Test
    |                      |
    +----------------------+
You should use the above topology if you have 2 (or more) ports on the host running Ostinato that you can connect to the Network (Device) under test.
If however, you don’t have 2 ethernet ports on the Ostinato host, or if the network is geographically spread out, use two different Ostinato instances like this -
Ostinato1 ------ Network (Device) Under Test ----- Ostinato2
Transmit Mode
For a QOS test you will likely have multiple traffic streams with different priority markings so that you can verify that the network (device) prioritizes and shapes the traffic correctly as per the QOS/COS configuration of the network/device.
The default transmit mode in Ostinato is sequential mode i.e. send ALL packets of stream 1 first before sending ALL packets of stream 2, followed by stream 3 and so on. This won’t work for testing QOS. You want to send all the streams together in parallel. This is referred to as Interleaved Transmit mode in Ostinato and is a configuration on the TX port.
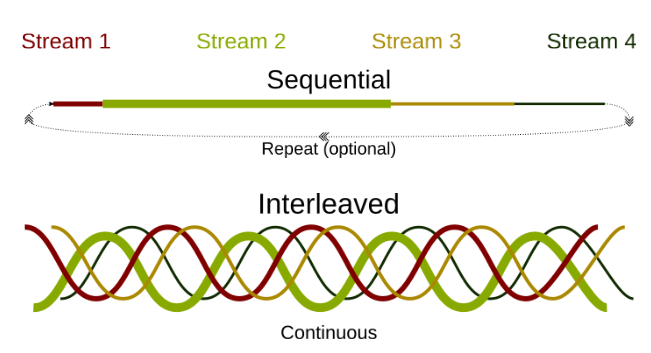
So, configure Interleaved transmit mode on both the Tx and Rx ports in your test topology on the single or multiple Ostinato instances. Also, enable Streams Statistics on all ports (we’ll learn why later).

Learn more about Ostinato Port Configuration.
Traffic Streams
Next, we configure our traffic streams.
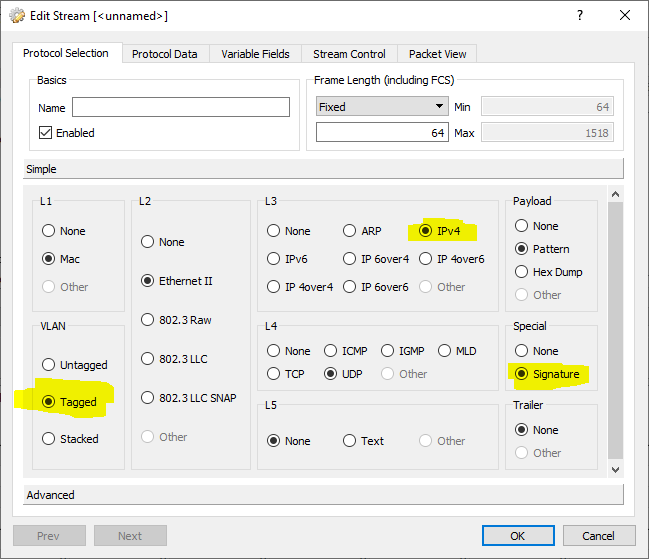
Create a traffic stream in Ostinato and set up the required network protocols within the stream as shown in the example image below. Make sure to select the Special Signature as well to enable per-stream statistics.
Priority Markings
For ethernet traffic, priority can be indicated via -
- 802.1p
- 802.1q (or 802.1ad) VLAN priority
- TOS or DSCP marking in the IPv4 Header
- IPv6 Traffic class (TC)
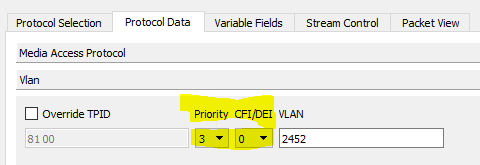
Layer 2 - VLAN (802.1p, 802.1q, 802.1ad)
Set up the layer 2 VLAN priority marking as shown in the /images below -
Layer 3 - IPv4 (TOS, DSCP)
You can set up the IPv4 TOS (Type of Service) or DSCP (Differentiated Services Code Point) field to the required value as shown in the image below -
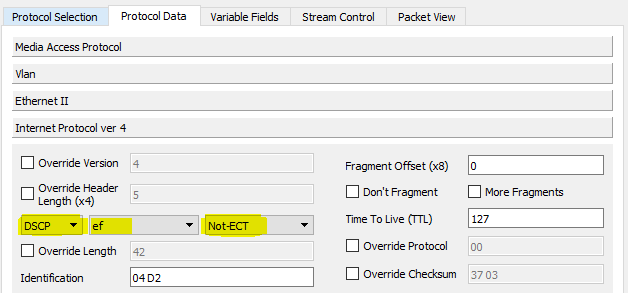
Both fields occupy the same position in the IPv4 header. Use the drop down to select whichever you need.
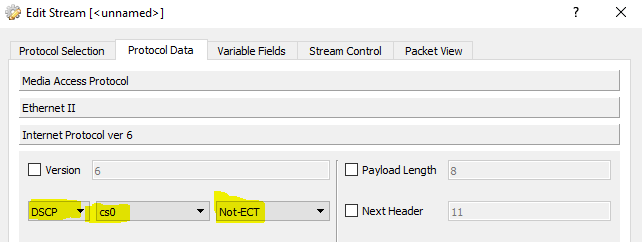
Layer 3 - IPv6 (Traffic Class)
You can configure the IPv6 Traffic Class marking as shown in the image below - similar to the IPv4 TOS/DSCP -
Once you’ve configured the stream with the required protocols, IP addresses and other packet field values along with the desired QOS markings, you can use Duplicate Streams (right-click context menu on the stream) or Copy and Paste to create multiple streams.
You want different traffic streams to have different QOS markings, so edit each stream to set the desired marking value.
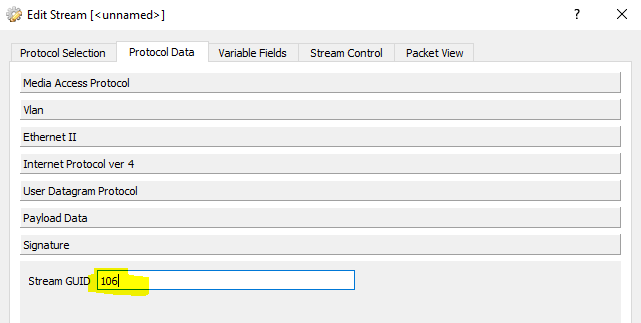
You should also configure unique GUID values for the Special signature for each stream -
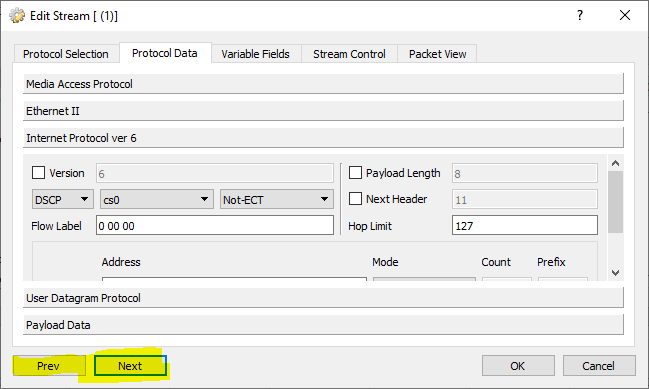
🔥 TIP: You can select and edit multiple streams and use the Prev and Next buttons to navigate between them
Create and configure as many traffic streams as you need with the desired QOS markings.
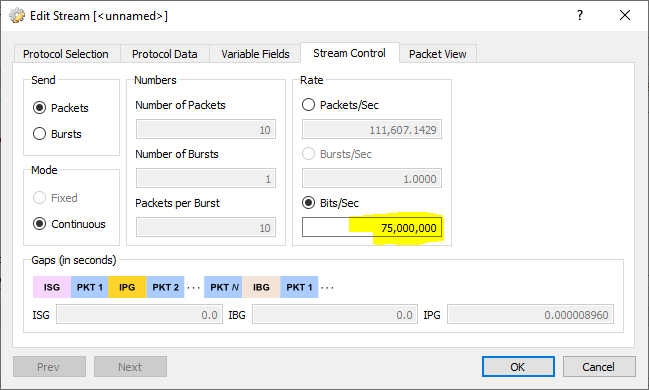
Traffic Rates
It’s quite likely that you want to send the different streams (with different QOS markings) at different rates. To do that, edit the streams and configure the desired rate in the Stream Control tab.
Once you have configured the individual stream rates, you can change the aggregate port rate - this will change the rates for all the active streams.

When you change the aggregate port rate, the delta between the old aggregate rate and new aggregate rate (positive or negative) is spread across all active streams such that the relative ratio of the stream rates remains the same.
Showtime
Once you have made all the configuration as described above and finalized the same by clicking the Apply button on each of the test ports, select both the Tx and Rx ports in the Port Statistics window and click on ▶️ Start Transmit, wait for some time for traffic to flow and then click on ⏹️ Stop Transmit.

While still keeping the Tx and Rx ports selected as earlier, click Fetch Stream Statistics. This will open a window with various statistics including packet loss, pkt/bit rates, latency, jitter, etc. for each stream -

To get this granular per-stream statistics is why we enabled Stream Stats Tracking on the port earlier - now you know!
Verification
Correlate the statistics in this window against the configured QOS/COS settings on the network/device under test to validate if the QOS configuration is working as expected or not.
If one or more traffic streams will be reclassified with a different priority marking in transit, you can start a Capture on the RX port and then View Capture the packets in Wireshark to verify the received QOS markings on the RX packets to check if they are same as expected.
If something is not clear, or if you have any questions, please chat with us!