
A popular use-case for Ostinato is to verify NAT/PAT and NAT/PAT scale.
A customer who is using a Linux based NAT box was able to use those guides successfully to verify conntrack scale for ICMP and UDP (conntrack is the Linux kernel module that provides the NAT functionality).
However they also wanted to verify TCP with conntrack.
As a stateless traffic generator, Ostinato does not support stateful TCP connections.
On further discussion, we established that the customer don’t need a “real” TCP connection, but just the 3-way TCP establishment handshake so that conntrack would mark the connection as Established and Assured. They did not want to invest in a stateful traffic generator tool only for TCP with Conntrack.
So how do you use stateless Ostinato to simulate a stateful TCP connection establishment?
This post shows you how.
Topology
Here’s let start with the test topology.
You need to have two Ostinato ports connected to the DUT - one for the client and one for the server. These can be two ports on the same Ostinato/Drone instance (keeping it simple) or two different Ostinato/Drone instances (e.g. if you want to test across geographies).
In the diagram below, port A is the client and port B is the server.
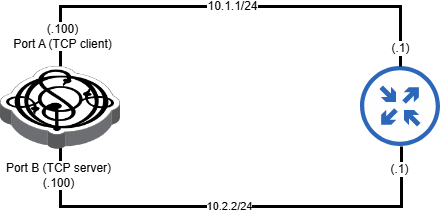
Configure emulated IP devices on each Ostinato test port as shown in the image above.
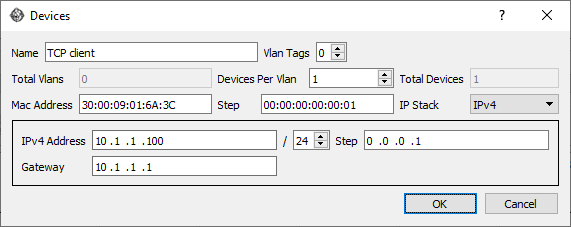
On Port A (TCP client) -
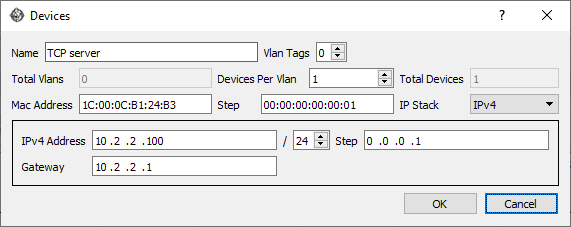
On Port B (TCP server) -
TCP connection establishment review
Next, let’s review the 3-way handshake packets exchanged in the connection establishment phase of a TCP connection -

Start simple - establish ONE TCP connection
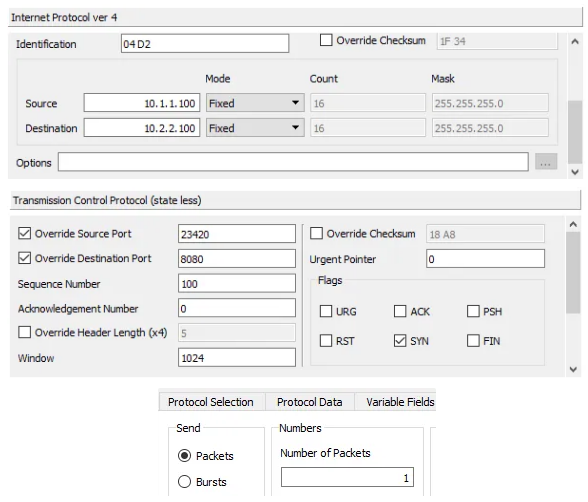
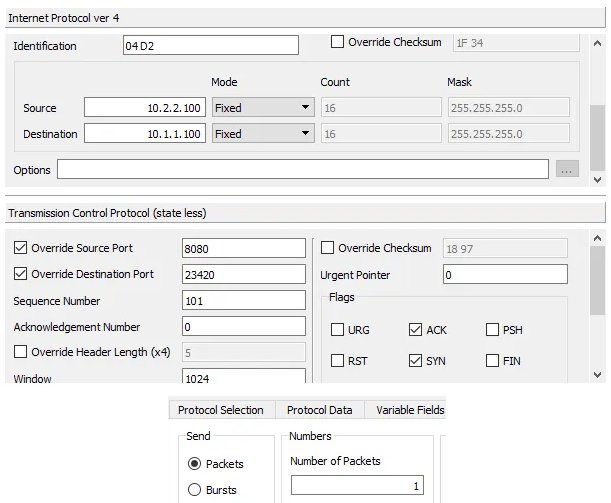
It’s always good practice to start simple and verify that before scaling anything. So, let’s start with crafting a SYN packet on port A based on the above diagram. Create a new Ostinato stream with the following protocols - Mac | Ethernet II | IPv4 | TCP. Configure the stream as follows -
- IPv4
- Source IP: 10.1.1.100
- Destination IP: 10.2.2.100
- TCP
- Source Port: 23420 (randomly chosen ephemeral port)
- Destination Port: 8080 (HTTP)
- Sequence Number: 100 (randomly chosen)
- Flags: SYN
- Stream Control
- No of packets: 1
Leave the rest of the fields at their defaults.
Next, let’s craft the SYN-ACK packet on port B. Create a new Ostinato stream with the following protocols - Mac | Ethernet II | IPv4 | TCP. Configure the stream as follows -
- IPv4
- Source IP: 10.2.2.100
- Destination IP: 10.1.1.100
- TCP
- Source Port: 8080 (HTTP)
- Destination Port: 23420 (ephemeral port)
- Sequence Number: 200 (randomly chosen)
- Acknowledgment Number: 101 (100 + 1)
- Flags: ACK, SYN
- Stream Control
- No of packets: 1
Leave the rest of the fields at their defaults.
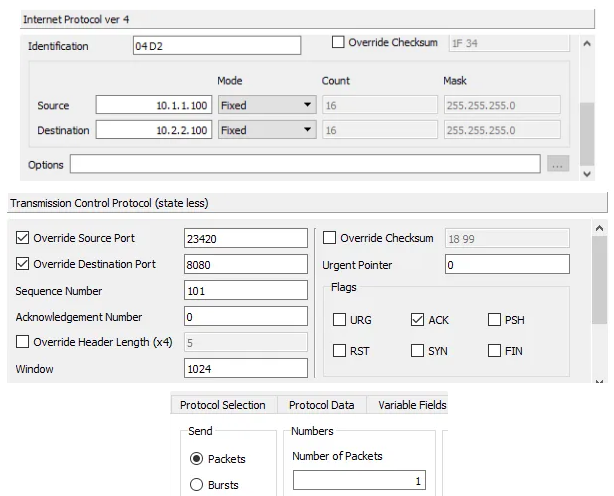
Next, let’s craft the ACK packet on port A. Create a new Ostinato stream with the following protocols - Mac | Ethernet II | IPv4 | TCP. Configure the stream as follows -
- IPv4
- Source IP: 10.1.1.100
- Destination IP: 10.2.2.100
- TCP
- Source Port: 23420 (ephemeral port used in SYN packet)
- Destination Port: 8080 (HTTP)
- Sequence Number: 101 (100 + 1)
- Acknowledgment Number: 201 (200 + 1)
- Flags: ACK
- Stream Control
- No of packets: 1
Leave the rest of the fields at their defaults.
To run the test, it is important to ensure that the packets are sent in the correct order from each side. So, do the following in the given order -
- Disable the ACK stream on port A (don’t forget to hit apply)
- Start Tx on port A so that the SYN packet is sent
- Start Tx on port B so that the SYN-ACK packet is sent
- Enable the ACK stream and disable the SYN stream on port A (don’t forget to hit apply)
- Start Tx on port A so that the ACK packet is sent
Yeah the above procedure is a little cumbersome. But read on, it’ll become easier shortly.
The above steps executed in the order given ensures that the connection establishment packets are sent in the correct order and conntrack correctly marks the connection as established. Here’s the output after each packet was sent -
$ sudo conntrack --flush

$ sudo conntrack --dump
tcp      6 117 SYN_SENT src=10.1.1.100 dst=10.2.2.100 sport=23420 dport=8080 [UNREPLIED] src=10.2.2.100 dst=10.1.1.100 sport=8080 dport=23420 mark=0 use=1

$ sudo conntrack --dump | grep src=10
tcp      6 58 SYN_RECV src=10.1.1.100 dst=10.2.2.100 sport=23420 dport=8080 src=10.2.2.100 dst=10.1.1.100 sport=8080 dport=23420 mark=0 use=1

$ sudo conntrack --dump | grep src=10
tcp      6 431997 ESTABLISHED src=10.1.1.100 dst=10.2.2.100 sport=23420 dport=8080 src=10.2.2.100 dst=10.1.1.100 sport=8080 dport=23420 [ASSURED] mark=0 use=1
Scale to a 1000 TCP connections
To test scale, we need to vary the TCP source/destination port numbers in the streams as follows -
For both the SYN and ACK streams on port A, add a variable field to each stream with the following configuration -
- Protocol: TCP
- Field: Source Port
- Value: 23420
- Count: 1000
- Step: 1
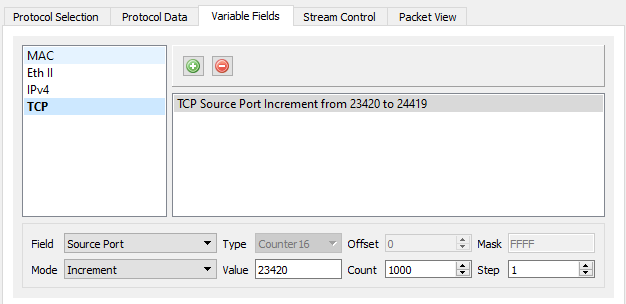
We also need to increase the number of packets in both the streams to 1000 and set packets/sec to 100.

For the SYN-ACK stream on port B, add a variable field to the stream with the following configuration -
- Protocol: TCP
- Field: Destination Port
- Value: 23420
- Count: 1000
- Step: 1
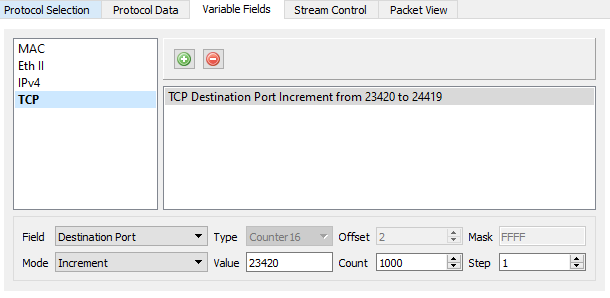
Increase the number of packets in this stream also to 1000 and set packets/sec to 100.
Before we run the test and establish 1000 connections, you may want to clear the conntrack table using conntrack --flush so that you have a clean slate.
To run the test, do the following in the given order -
- Start Tx on port A
- Start Tx on port B
Don’t start Tx on both ports at the same time!
You should see the conntrack table grow as the connections are established (use conntrack --dump to dump the table)
$ sudo conntrack --flush
conntrack v1.4.6 (conntrack-tools): connection tracking table has been emptied.

$ sudo conntrack --dump
tcp      6 431988 ESTABLISHED src=10.1.1.100 dst=10.2.2.100 sport=24167 dport=8080 src=10.2.2.100 dst=10.1.1.100 sport=8080 dport=24167 [ASSURED] mark=0 use=1
tcp      6 431990 ESTABLISHED src=10.1.1.100 dst=10.2.2.100 sport=24390 dport=8080 src=10.2.2.100 dst=10.1.1.100 sport=8080 dport=24390 [ASSURED] mark=0 use=1
tcp      6 431987 ESTABLISHED src=10.1.1.100 dst=10.2.2.100 sport=24100 dport=8080 src=10.2.2.100 dst=10.1.1.100 sport=8080 dport=24100 [ASSURED] mark=0 use=1
tcp      6 431990 ESTABLISHED src=10.1.1.100 dst=10.2.2.100 sport=24340 dport=8080 src=10.2.2.100 dst=10.1.1.100 sport=8080 dport=24340 [ASSURED] mark=0 use=1
tcp      6 431981 ESTABLISHED src=10.1.1.100 dst=10.2.2.100 sport=23527 dport=8080 src=10.2.2.100 dst=10.1.1.100 sport=8080 dport=23527 [ASSURED] mark=0 use=1
tcp      6 431983 ESTABLISHED src=10.1.1.100 dst=10.2.2.100 sport=23645 dport=8080 src=10.2.2.100 dst=10.1.1.100 sport=8080 dport=23645 [ASSURED] mark=0 use=1
tcp      6 431988 ESTABLISHED src=10.1.1.100 dst=10.2.2.100 sport=24192 dport=8080 src=10.2.2.100 dst=10.1.1.100 sport=8080 dport=24192 [ASSURED] mark=0 use=1
. . .
. . .
tcp      6 431984 ESTABLISHED src=10.1.1.100 dst=10.2.2.100 sport=23812 dport=8080 src=10.2.2.100 dst=10.1.1.100 sport=8080 dport=23812 [ASSURED] mark=0 use=1
tcp      6 431990 ESTABLISHED src=10.1.1.100 dst=10.2.2.100 sport=24385 dport=8080 src=10.2.2.100 dst=10.1.1.100 sport=8080 dport=24385 [ASSURED] mark=0 use=1
tcp      6 431982 ESTABLISHED src=10.1.1.100 dst=10.2.2.100 sport=23543 dport=8080 src=10.2.2.100 dst=10.1.1.100 sport=8080 dport=23543 [ASSURED] mark=0 use=1
tcp      6 431989 ESTABLISHED src=10.1.1.100 dst=10.2.2.100 sport=24238 dport=8080 src=10.2.2.100 dst=10.1.1.100 sport=8080 dport=24238 [ASSURED] mark=0 use=1
tcp      6 431982 ESTABLISHED src=10.1.1.100 dst=10.2.2.100 sport=23606 dport=8080 src=10.2.2.100 dst=10.1.1.100 sport=8080 dport=23606 [ASSURED] mark=0 use=1
tcp      6 431987 ESTABLISHED src=10.1.1.100 dst=10.2.2.100 sport=24048 dport=8080 src=10.2.2.100 dst=10.1.1.100 sport=8080 dport=24048 [ASSURED] mark=0 use=1
tcp      6 431986 ESTABLISHED src=10.1.1.100 dst=10.2.2.100 sport=23955 dport=8080 src=10.2.2.100 dst=10.1.1.100 sport=8080 dport=23955 [ASSURED] mark=0 use=1
conntrack v1.4.6 (conntrack-tools): 1000 flow entries have been shown.
Why didn’t we have to do all the stream enabling/disabling steps this time?
Here’s the explanation.
When you start Tx on port A, Ostinato starts transmitting SYN packets from port A. 1000 packets at 100 packets/sec means that it will take 10 seconds to transmit all the packets.
When you start Tx on port B (before the 10 seconds are up), Ostinato starts transmitting SYN-ACK packets from port B which will also take 10 seconds to complete.
Once port A finishes transmitting all the SYN packets, it starts transmitting ACK packets without waiting or checking if SYN-ACK packets were received (remmeber, Ostinato is a stateless traffic generator).
So how does this ensure the SYN, SYN-ACK and ACK packets are sent in the correct order?
Let’s take the first connection (23420 <–> 8080) as an example -
- SYN (23420 -> 8080) is sent from port A at time
0sand is seen by the DUT first - SYN-ACK (8080 -> 23420) is sent from port B at time
2s(for example) and is seen by the DUT next - ACK (23420 -> 8080) is sent from port A at time
10s(SYN stream takes 10s to complete) and is seen by the DUT last
Although both ports are transmitting simultaneously and without any synchronization, the DUT sees the packets in the correct order for each connection.
Thus the DUT sees the packets in the correct order for all connections and marks the connection as established.