
Ostinato’s primary mode of configuration and monitoring is through the GUI.
When using Ostinato for labbing (irrespective of the labbing platform - GNS3, EVE-NG, CML, Containerlab, etc.), the GUI is displayed via VNC.
While usable, the VNC experience can sometimes feel a bit - wanting.
But you are not stuck with just VNC - there’s another option.
You can use Ostinato for Windows/MacOS GUI on your laptop and connect to the Ostinato node in the lab over the management network – thanks to the Ostinato controller-agent architecture.
🛒 You may need to purchase a separate license for Ostinato on Windows or MacOS
This guide will show you how to use the Ostinato GUI on Windows/MacOS to configure, control and monitor the Ostinato nodes in your virtual lab.
TLDR - Connect the Ostinato node in your virtual lab to the external/mgmt network and then use Ostinato GUI on your Windows/MacOS laptop to access it.
Here are detailed steps.
Step 1 - Connect the Ostinato node to the host network
Here are instructions to do so for all the supported labbing platforms.
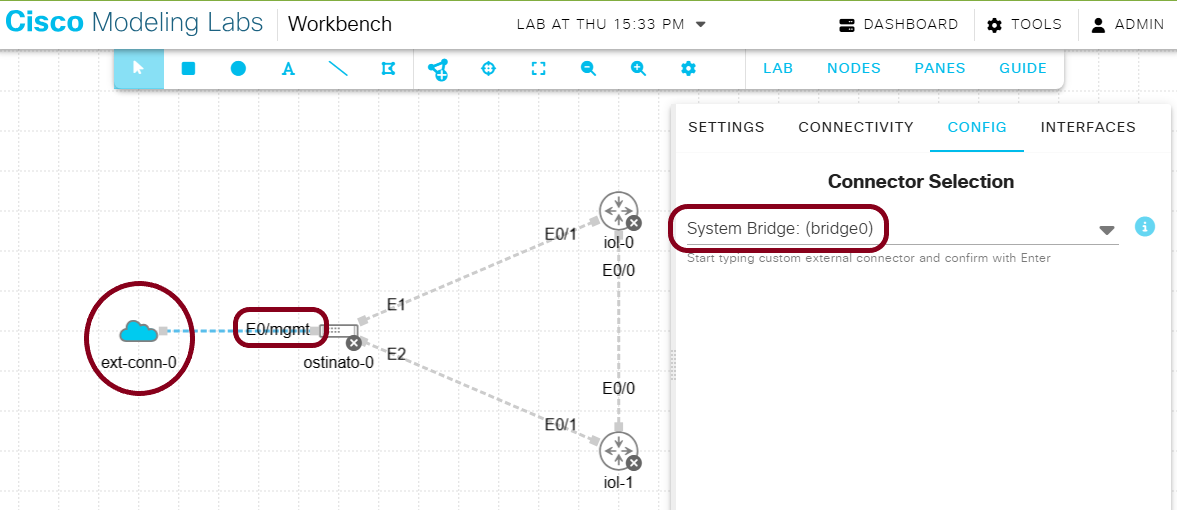
CML
- Add the
External Connectornode to the lab - Configure the just added
ext-conn-0node to use bridge mode (not NAT mode) - Add a link betweeen the
ext-conn-0node and the Ostinato node - Make sure to select the
eth0/mgmtinterface on the Ostinato node for the link
Start the lab, open the Ostinato console and run ifconfig eth0 to verify that the Ostinato node is assigned a DHCP IP address.
EVE-NG
- Add a new
Networkto the lab of typeManagement(Cloud0) - Add a link betweeen the network node and the Ostinato node
- Make sure to select the
eth0/mgmtinterface on the Ostinato node for the link

Start the lab, open the Ostinato console and run ifconfig eth0 to verify that the Ostinato node is assigned a DHCP IP address.
GNS3
- Add a new
NATnode to the lab - Add a link betweeen the NAT node and the Ostinato node
- Make sure to select the
eth0/mgmtinterface on the Ostinato node for the link

Start the lab, connect to the Ostinato VNC, open a terminal and run ifconfig eth0 to verify that the Ostinato node is assigned a DHCP IP address.
Containerlab
- Edit your
clab.ymlfile to add the below port mappings for the Ostinato node.
. . .
topology:
  nodes:
    ost:
      kind: linux
      image: ostinato/ostinato:{tag}
      ports:
        - 5900:5900/tcp
        - 7878:7878/tcp
      binds:
        - .:/root/shared
. . .
- Deploy the lab with the usual
clab deploy - Use VNC to connect to the Ostinato node using the
<host-ip>:5900address – even if you plan to connect to the Ostinato node over the management network using a Windows/MacOS native GUI, you need to first connect via VNC – this is due to the way Ostinato integration for containerlab is implemented
📛 To connect to the Containerlab Ostinato node from the GUI, use the Host’s IP address in the next step - this is because we have mapped the container’s ports to the host ports
During lab deployment, if you see an error like bind: address already in use - it means that the port 7878 is already in use. Maybe a native instance of Drone is running on the host or some other application on the host is using port 7878. You can change the port mapping to a different port e.g. 8878:7878 and redeploy the lab. With this mapping, you should use port 8878 when connecting from the GUI.
Step 2 - Connect from GUI to the Ostinato node
Run a ping from your laptop to the Ostinato node to verify that the connection is working.
🔁 If ping is not working - troubleshoot this connectivity before proceeding
Once you verify connectivity, use File | New PortGroup from the Ostinato GUI running on your laptop and enter the IP address of the Ostinato node.
You should see the Ostinato node in the Ostinato port list. The ports listed under the port group are the ports on the Ostinato node in your lab.
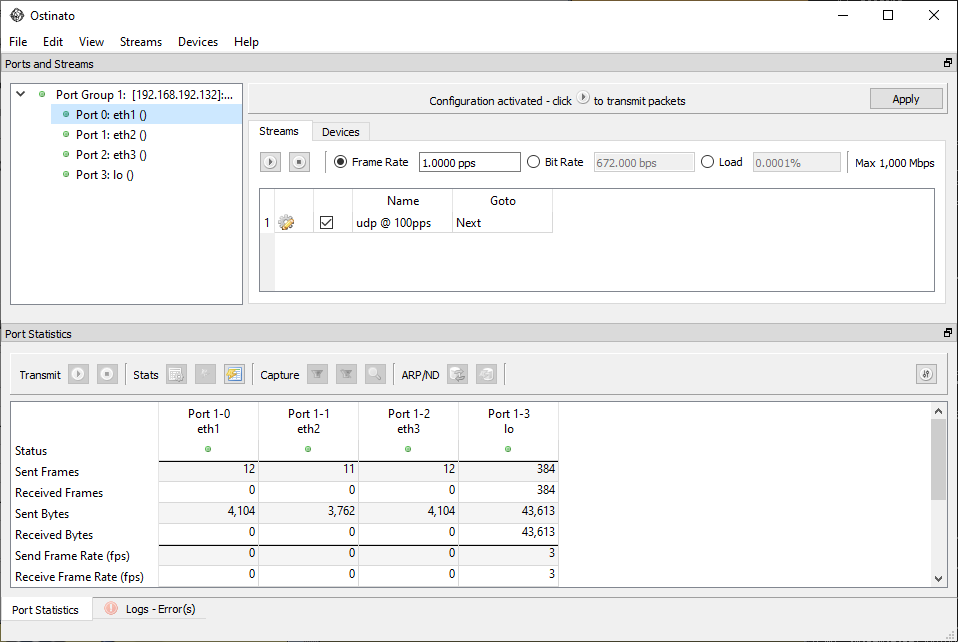
You can now use the Ostinato GUI on your laptop to configure, control and monitor the Ostinato node.
🔥 If ping is working, but Ostinato GUI is not able to connect to the Ostinato node - check if the firewall is blocking TCP port 7878. If required, add a rule to allow traffic on this port.