
In a L2 network, it is important to protect the network from packet storms to ensure that it doesn’t bring down the network for users and other applications. This is even more important on industrial networks which maybe operating only at 100 Mbps but a storm can lead to critical sensor and equipment data to not be delivered.
To protect the network from these packet storms, L2 switches provide security features such as storm control and rate limiting. Please refer to your vendor documentation for identifying and help on configuring these features.
In this guides post we will understand the various types of packet storms and how to generate these storms using Ostinato so that you can test your network and network devices.
Storm Test Topology
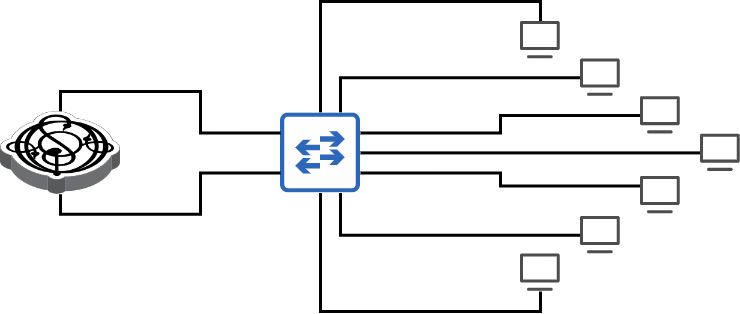
Let’s first talk about the topology for the storm tests. Connect the PC/server running Ostinato to the switch (or network) under test. We connect two ports on the switch to Ostinato - one for Tx and another for Rx.
Broadcast Storm
A broadcast packet is sent to all ports on the switch (except the one from which the packet was received). If you have multiple interconnected switches, a broadcast packet can quickly flood every network segment quickly. A constant stream of broadcast packets at high rates will create a broadcast storm.
If the network has any loops (STP or otherwise), the situation will escalate and worsen very quickly.
You typically use a broadcast storm control configuration on your switch(es) to protect yourself. To verify your broadcast storm control is working as configured and expected, you can generate a broadcast storm using Ostinato.
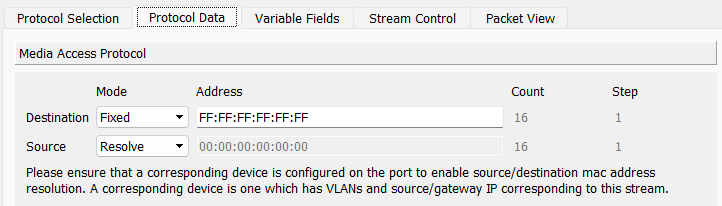
To create a broadcast stream, create a stream with protocols as Mac | Ethernet | IPv4 | UDP | Pattern with the following settings -
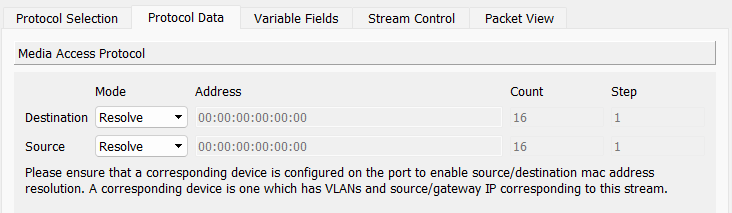
- Mac
- Destination:
FF:FF:FF:FF:FF:FF(Fixed mode) - Source: Resolve Mode
- Destination:
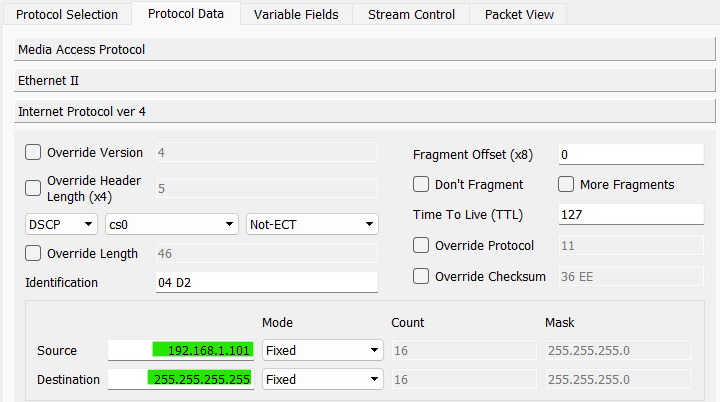
- IPv4
- Source IP:
<interface ip> - Destination IP:
255.255.255.255
- Source IP:
On the stream control tab, set a bit rate higher than what is configured as the storm control threshold on the switch and set Next to Goto First.
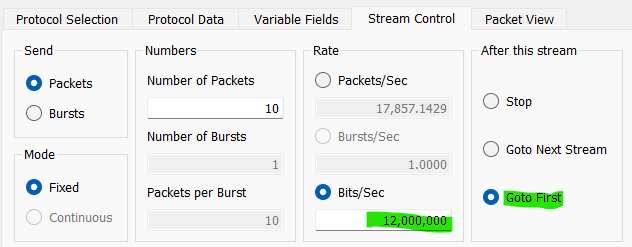
Hit Apply and Start Transmit.
Multicast Storm
Most L2 switches by default treat multicast as broadcast i.e. when they receive a L2 multicast packet, they forward it to all the other ports on the switch - please verify your vendor documentation to confirm this behaviour.
If your L2 switch does not treat multicast as broadcast by default and instead has features such as IGMP snooping or MLD snooping, you can still land up with multicast storms if there are a lot of listeners to high-rate multicast streams. You can use Ostinato to dynamically create these multicast groups and listeners and verify your switch is protected from multicast storms.
Assuming your switch is like most switches and treats multicast as broadcast, we have the same problem as the broadcast storm.
To create a multicast storm, create an Ostinato stream with protocols as Mac | Ethernet | IPv4 | UDP | Pattern with the following settings -
- Mac
- Destination: Resolve Mode
- Source: Resolve Mode
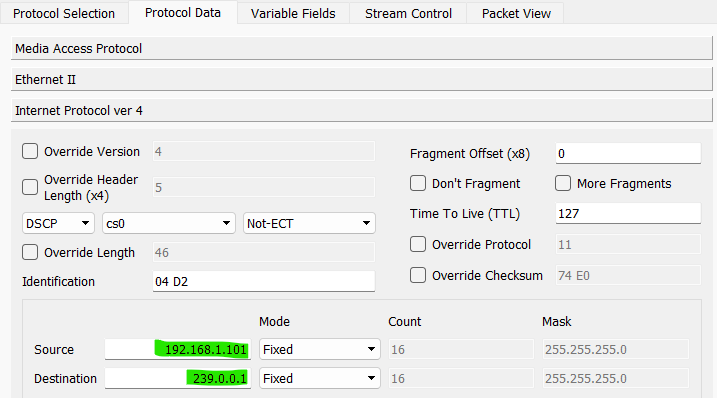
- IPv4
- Source IP:
<interface ip> - Destination IP:
239.0.0.1
- Source IP:
On the stream control tab, set a bit rate higher than what is configured as the multicast storm control threshold on the switch and set Next to Goto First.
Hit Apply and Start Transmit.
For the basics of crafting multicast packets in Ostinato, see how to generate and verify multicast traffic.
Unknown unicast or Flooding
You can have a storm even with unicast packets - more specifically an unknown unicast packet.
An unknown unicast packet is one whose destination mac address is not in the switch’s Mac Address Table, so the switch does not know which port to forward the packet on. So, it floods the packet on all ports!
If other switches on your network have also not learnt that mac address you end up with the packet being effectively broadcast. So you need to protect yourself against this as well. Check your vendor documentation for unknown unicast or flood storm control.
To create a unknown unicast or flooding storm, create an Ostinato stream with protocols as Mac | Ethernet | IPv4 | UDP | Pattern with the following settings -
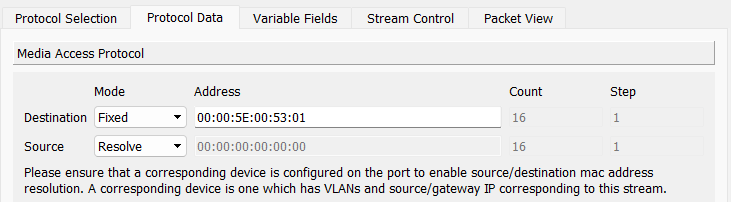
- Mac
- Destination:
00:00:5E:00:53:01 - Source: Resolve Mode
- Destination:
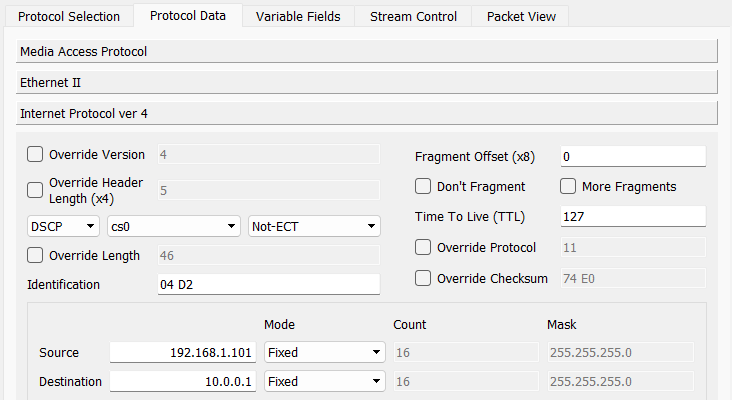
- IPv4
- Source IP:
<interface ip> - Destination IP:
10.0.0.1
- Source IP:
On the stream control tab, set a bit rate higher than what is configured as the unknown unicast storm control threshold on the switch and set Next to Goto First.
Hit Apply and Start Transmit.
A note on the choice of Destination Mac and IP address for Flood Storm Test
For the unknown unicast flood test, it is a MUST that the destination mac address is NOT already learnt in the switch’s mac address table. The Mac address used above 00:00:5E:00:53:01 belongs to the Mac address range that is designated for documentation purposes and thus there is a very good chance that it will NOT be present in the Mac table - but it’s always good to double-check once before the test.
For L2 forwarding, a switch looks only at the Mac address and not the IP address. Hence the destination IP address in the packet is a don’t care.
Verification
To verify if storm control is working -
- Check any storm control show commands on the switch - check your vendor documentation
- Check the Rx rate on the second port connected to the switch - this should be lower than the Tx rate and match the storm control threshold configured on the switch
Make sure you verify your storm control configurations with real traffic before deploying in production!