
Ostinato can generate traffic on any OS supported network interface including a LAG interface.
In this guide, we show you how to configure link aggregation (LAG) interface on Linux. LAG on Linux is called a bond interface. For the concepts behind LAG and ECMP, see link aggregation and ECMP.
Once created, the LAG interface will be listed in Ostinato. You can use it as any other ethernet interface. Any stream sent on the LAG interface will be load balanced across its member interfaces (depending on the configured hash policy).
Without further ado, let’s create a LAG bond interface on Linux.
📌 Please note you will need to be root or use sudo to run all these commands.
Bonding kernel module
Bonding support in Linux is provided by the bonding kernel module. To start with check if the kernel module is already loaded -
lsmod | grep bonding
If the above command returns an empty output, it means the module is not loaded and you need to load the module manually -
modprobe bonding max_bonds=3 miimon=100 mode=802.3ad xmit_hash_policy=layer3+4
Repeat the lsmod command above to verify that the module has been loaded successfully.
A note on module parameters
Here’s an explanation of the module parameters used above.
max_bonds specifies the maximum number of bond interfaces that will be created when you load the module (by default this is 1, but you need to create the bond interface explicitly).
miimon specifies the link monitoring frequency in milliseconds for failures.
mode 802.3ad configures LACP mode - the remote end will also need to support LACP. See the kernel documentation for other supported modes.
xmit_hash_policy layer3+4 configures the 5-tuple [source IP, destination IP, IP protocol type, L4 source port, L4 destination port] as the hash fields.
You can read more about these and other parameters in the Linux Kernel bonding documentation.
To examine the module parameters for the already loaded bonding module, you can examine the files at /sys/module/bonding/parameters. Instead of having to cat each file, here’s a convenient one-liner to display them all -
find /sys/module/bonding/parameters/ -type f -print0 | xargs -0 -I{} sh -c 'echo "$(basename {})": "$(cat {})"'
If you need to change any module parameters, you need to unload the module using rmmod first and then run modprobe with the desired parameters.
Bond Interface and Member links
Use the ip utility to create the bond interface (if not already created) -
ip link add dev bond0 type bond
Before we can add member interfaces to the bond0 interface, disable them first (you cannot add enabled interfaces to the bond interface)-
ip link set dev eth0 down
ip link set dev eth1 down
Next, add the member interfaces to bond0 -
ip link set dev eth0 master bond0
ip link set dev eth1 master bond0
Finally, enable the bond interface - it will automatically enable the member links too (if it doesn’t, please manually enable the member links first, then the bond interface)
ip link set dev bond0 up
You can list the member links of any bond interface -
ip link show master bond0
You are now all set to send traffic out of the bond0 interface using Ostinato!
Bond interface in Ostinato
If you don’t see the bond0 interface in Ostinato, please restart the Ostinato Drone agent (The Drone agent reads the list of interfaces only once when it starts, so any subsequently created interfaces require Drone to be restarted).
Also, note that only admin-enabled interfaces are visible and accessible to Ostinato.
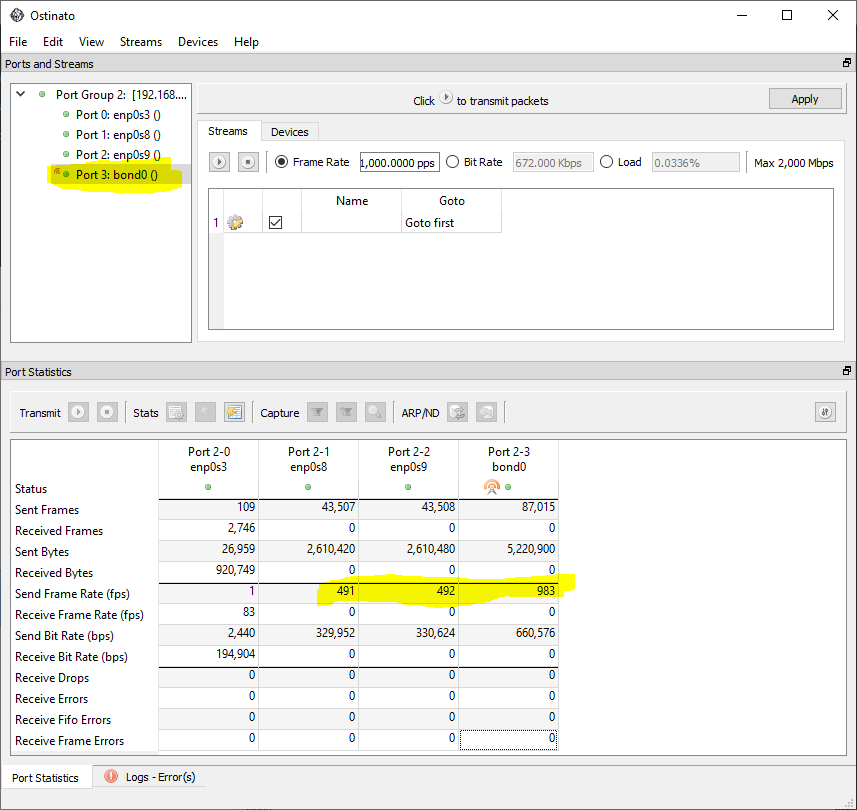
The image above shows that the traffic sent on the bond0 interface is load-balanced amongst its member links. You can monitor traffic statistics on the LAG and individual member interfaces.
🎶 If you used a flow-aware hash-policy such as layer3+4, you must generate multiple flows using Ostinato to see traffic being load-balanced, otherwise with a single flow all traffic will use only one interface!
To verify load-balancing and understand common pitfalls (elephant flows, polarization, flow remapping), see load-balancing problems and solutions.